

by Mike Fukuda
There are several short-shifters available for the Miata (see discussion at the end of this article). This guide describes the removal and installation of a short shifter in a 2000 Miata with 5-speed transmission. I believe these instructions may be adapted to any of the NA (1990-97) and NB (1998-2005) models (see NOTE 1). These detailed instructions are intended for everyone including those who are not skilled mechanics.
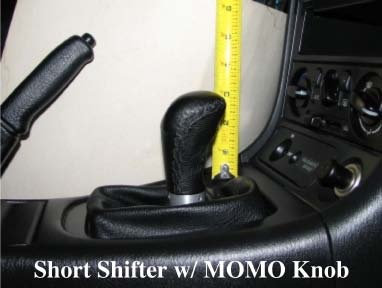
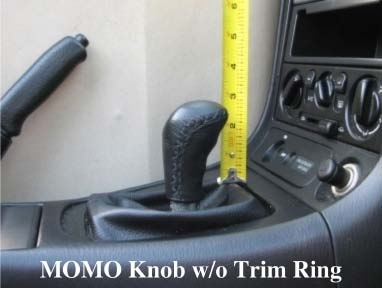
Some vendors modifiy the stock shifter while keeping the most important mechanical dimension (i.e. fulcrum radius) unchanged. The length of the modified shifter is reduced by 1.5 inches.The first two photos below show the stock shifter compared to the a short shifter with a stock shift knob. The short shifter lowers the stock knob by 1.5 inches and lowers the shifter into the well (which IMHO is too short). The third photo shows the short shifter with a MOMO Super Anatomic Shift Knob. This MOMO knob is longer than others and provides a good balanced feel (try it). The last photo shows the MOMO knob installed without the trim ring thus shortening the shifter by 1/4 inch (this modification would require modifying the boot).


Parts List:
Short Shift Lever (and Shift Bushing)
Upper Shift Boot (could be reused)
Lower Shift Boot
Tools:
10mm wrench or socket (avoid adjustable wrenches for this work)
Medium Phillips-head Screwdriver
Small Flat-head Screwdriver(s)
Silicon Lubricant
Shop Towels
Also consider the following:
• The Lower Shift Boot is probably torn if the car has more than 50K miles – do yourself a favor and order one in advance.
• The oil in the shifter sump is probably dirty, especially if the Lower Shift Boot is torn. I recommend changing the oil or better yet, replacing it with synthetic oil. To do this you need:
Large syringe (e.g. “Turkey Baster”)
SAE 75-90 oil, about 90cc (3 ounces) and a waste container (for used oil)
1. Remove shift knob and ash tray.
2. Remove center console (there are five screws here, see photo):
2.1 One screw in well beneath ashtray.
2.2 Two screws in storage compartment at aft end of console.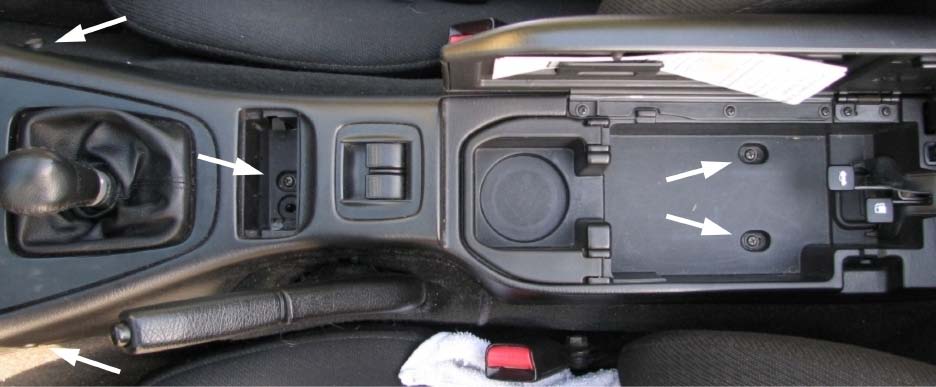
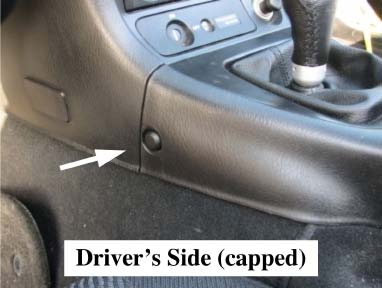
2.3 Two screws (one per side) located under trim caps at the front lower corners of the console (see following photos). Use a small flathead screwdriver to carefully pry open the caps.
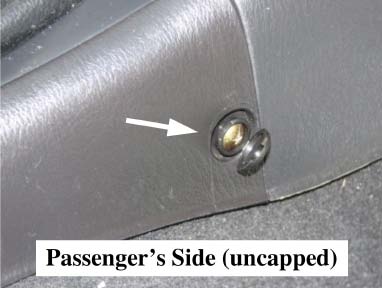
2.4 Carefully lift front of the console STRAIGHT UP – this will release two hidden snap clips.
2.5 Slide console forward just far enough to clear the remote levers in the rear compartment.
2.6 Turn console on its side (you do not have to disconnect any electrical connectors). Otherwise, you must disconnect the battery BEFORE disconnecting any cables.
3. Inspect insulation (3 pieces) then remove and put aside (to reinstall later). Mazda sells replacement insulation if needed. Make note of how the wiring is arranged for later.
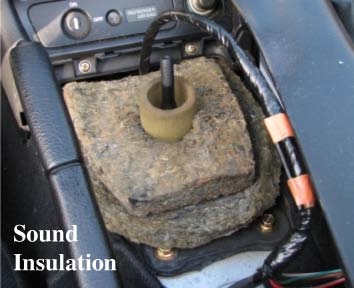
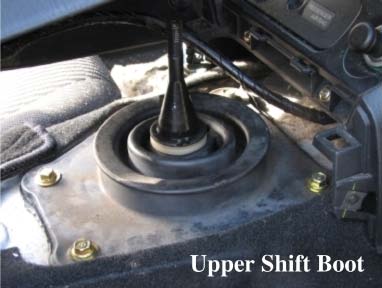
4. Remove Upper Shift Boot as follows:
4.1 Remove four bolts on the Upper Shift Boot.
4.2 Carefully pry up the edge of the boot plate to loosen it. Try to keep the insulation (seal) underneath from tearing. At this point the boot is only secured at the shaft.
4.3 Spray the rubber and shifter shaft with silicon lubricant – I used a towel to limit overspray.
4.4 Grasp plastic retaining ring and slide the boot off.
4.5 If you plan to reuse the Upper Shift Boot, clean it with silicon lubricant and set it aside. Do NOT lose the plastic ring. But, if you purchased a new Upper Shift Boot, it comes complete with the plastic ring and the thin insulation seal already attached.
5. Remove Lower Shift Boot and Shift Lever:
5.1 Remove three bolts holding Lower Shift Boot to transmission housing.
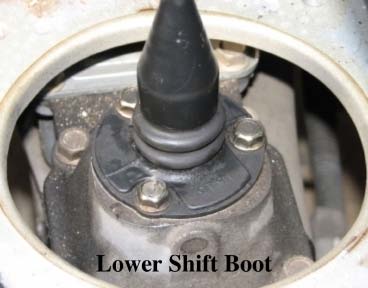
5.2 Lift Shift Lever out of the transmission – use a towel to keep oil from dripping.
5.3 Put a towel over the open sump to prevent anything falling into it.
At this point the removal is complete. All of the parts can be reused or replaced. Make note of how the parts, especially the shift lever, are assembled/arranged. Re-installation procedures are described below
6. Replace the Oil in the sump:
6.1 Use the syringe to draw out the old oil and dispose of it properly.
6.2 Refill the sump with new oil.
6.3 I did the above twice to get contaminated material (e.g. dust) out of the sump.
6.4 The oil should definitely be replaced if the Lower Shift Boot is torn since the old oil is likely contaminated with dust and/or water.
7. You may have to remove the Shifter Bushing – the plastic part on the small ball at the end of the shift lever. The best way to do this is to tap it out as follows:
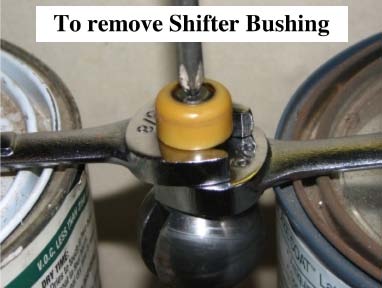
7.1 Use a wrench (e.g. 5/8 inch) that is smaller than the bushing and larger than the ball that it sits on.
7.2 Place the wrench flat between two supports such as two paint cans and hang the shift lever upside down as shown. Make sure that the lever is exactly centered in the wrench to prevent marring the surface of the ball.
7.3 Place the tip of the Phillips head screwdriver in the divot on the ball and strike it sharply to release the bushing.
8. Install Shifter Bushing.
8.1 Place the bushing flat on a piece of wood or cardboard.
8.2 Place the shift lever on top of it and gently tap it on.
NOTE: The NB Miata shift lever is NOT STRAIGHT – it has a slight bend in it. The best way to find this is to hold the ends of the shift lever and spin the assembly. You will find the shift lever has a definite bias. I don't know which way the lever is supposed to fit. I installed mine so that the lever “bends” backward (it feels better this way). IMHO, installing the lever “bending” forward is better engineering-wise, but it doesn’t feel quite right. This is probably only an issue on the NB shifters that have two slots on the fulcrum ball. The earlier models have one slot on the ball and can only be installed one way.
9. Install the large shifter bushing (spring-keeper ring) on the new shift lever – note that the spring should be on the top side (opposite the fulcrum ball).
10. Install the Lower Shift Boot on the shift lever.
10.1 Lubricate the upper and lower surfaces of the large shifter bushing.
10.2 Put a small amount of oil on the inside ribs of the Lower Shift Boot.
10.3 Slide the boot over and down the shift lever until the boot clears the upper part of the shaft.
11. Install the shift lever and Lower Shift Boot. Note the following:
11.1 Dip the bushing in oil and insert the shift lever into the sump. Properly seating the bushing is a little tricky. Play with the shift lever until the bushing drops into the seat.
11.2 Carefully install the three bolts holding the shift lever in place but do not overtighten them. These bolts are soft and will break if over-torqued.
11.3 If there is a large gap between the shift boot flange and the sump housing (see photo), the shift lever is not yet seated properly.
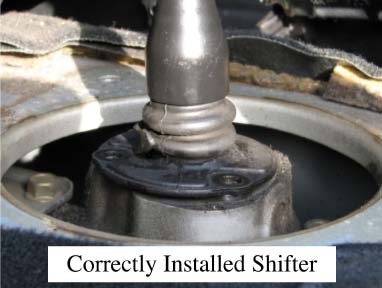
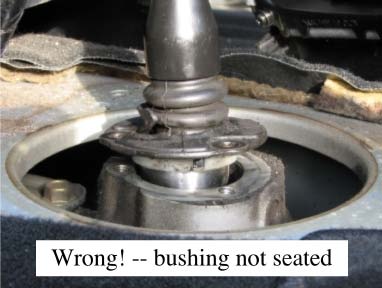
12. Install the Upper Shift Boot as follows:
12.1 Clean the area around the opening in the car body, if necessary.
12.2 Slide the Upper Shift Boot over the shifter shaft and install the four bolts.
12.3 Slip the plastic ring in the slot on the rubber boot and slide the ring down until the “crown” of the shaft is just visible (see picture for the installed Upper Shift Boot above, Step 4).
12.4 You can first lubricate the inside surface of the rubber boot and/or shifter shaft with silicone to make this easier.
13. Install the center console.
13.1 Install the insulation (three pieces) and adjust the harness wires as found during removal.
13.2 Maneuver the console over the trunk and fuel filler lid remote opening levers; then position the console in place and gently tap the front end to seat the snap clips.
13.3 Install the five screws to secure the console. Avoid overtightening the screws because the plastic around them can break easily.
14. Install the shift knob and you’re done!
NOTE 1 – Shifter and Shift Knob Applicability
The shifters for the NA and NB Miatas differ in one key design feature. The fulcrum ball on the NA
shifter has a single slot while the NB shifter has two slots on opposite sides of the ball. These slots fit
over corresponding static pin(s) in the gearbox well. Thus, an NA shifter will not seat properly in an NB
gearbox because of the second pin. A workaround (removing the second pin) was posted in another
Miata.net forum; however, I would not recommend it. For an NB model Miata, make sure the shifter is
correct (has two slots). You may be able to get a used shift lever from an auto recycler.
Finally, most MOMO Shift Knobs use a universal adapter with set screws. While this adapter kit works,
the overall result is flimsy and leaves much to be desired. Someone came up with an elegant solution
where a machined sleeve is inserted between the MOMO knob and the shift lever (I found this adapter at
GoMiata.com). The finished result is perfect.
Removing the Lower Shift Boot to Reuse It (courtesy of East Coast Miata)
“… If it (the rubber boot around the base of the lever) is torn, dry rotted, or in bad shape, I would suggest
replacing it. Of course the final decision is yours.
The rubber boot really does come off the old lever, but it is not the easiest part to remove by any stretch
of the imagination. I would suggest, first, to spray some silicone on the inside of the boot and a little on
the lever as well. What I do to remove the boot is carefully get a screwdriver between the boot and the
lever. Pry up the boot, and using a needle nose pliers or a needle nose vise grip, I grab the boot and hold it
with the plyers (sic). Then I work the screwdriver around the boot until the whole boot is stretched over
the lever. Finally work the boot back until it slides off the lever. The boot will only come off straight; you
cannot fold the rubber over and expect it to slide off. It won’t.
Remove the plastic ring (i.e. Large Shifter Bushing) with the spring attached to it. Remember, the spring
faces UP when you re-assemble the new shifter.”
NOTE: Unless this part is in PERFECT shape, replacing it is easier, faster and less aggravating. Also,
it's probable a good idea to check this part every 30K miles or so. – Mike.
A Note on the Types of Short Shift Kits
Most short shift kits shorten the throw (i.e. the distance the shift lever moves) by changing the length of a
linkage component; however, the MX-5 Miata does not employ a shift linkage like other imports; instead,
the shift lever inserts directly into the gearbox in the transmission housing. There are two types of short
shifters for the Miata, as discussed below:
The first type of short shifter increases the distance between the fulcrum and the end of the shifter – I call
this a “short-throw shifter”. Most vendors, including MazdaSpeed, offer this type of shifter. I suspect that
even though this works, the longer fulcrum radius may increase stress on the gearbox and adversely affect
the overall reliability of the unit.
The other type of short shifter reduces the length of the lever above the fulcrum and keeps the stock
fulcrum radius – I call this second type a “short-shifter”. By retaining the stock shifter dimensions,
especially the fulcrum radius, the mechanical operation of the gearbox and transmission are unmodified.
This ensures that the stock (i.e. proven) Mazda design and reliability are not compromised. For this
reason, I prefer this type of shifter over the first type. Using the stock lever as a starting point, Ken at East
Coast Miata makes a fine product with great fit and finish. I was very pleased with the overall installation
and operation.
Another discussion of short shifters follows: (from miata.net )
Replacement Shift Lever to Shorten Shift Throw by Eric Amador - eria@validigm.com
I'm adding my observations to several other reviews, because I have some thoughts and suggestions that
may be helpful to people trying to decide between this kit and the type of short-shifter that the Dealer
Alternative, C's, and MazdaSpeed offer (I'll call that type the "C's" shifter, and my type the "BSP"
shifter). The C's shifter is more solid and higher-quality; but the BSP is cheaper and makes the shift knob
sit much lower on the center console. The shaft in the BSP shifter is thin metal (aluminum?) and simply
reduces the lever's length relative to that of the OEM and C's shifters. The BSP kit has the same fulcrum
as the OEM shifter, which is lower than the C's shifter. The BSP's shorter length substantially reduces the
shift throw, but the angle of the lever at each throw is identical to that of the OEM shifter, because the
fulcrum is identical. The C's kit has a long beefy milled shaft, like the OEM shifter, but raises the fulcrum
substantially. Consequently, the knob sits up high (same height as the OEM?), but the angle of each throw
is much smaller. This raised fulcrum on the C's design increases the shifting effort, but not to an annoying
extent. As compared to the OEM shifter, the BSP kit also has less leverage and is thus notchier than the
OEM shifter. I'm not sure which is notchier, the BSP or the C's. Adding to its notchiness vis-à-vis the
OEM kit, is the fact that the BSP kit does not have a rubber damper built inside its shaft. I believe that the
C's-type kits (except maybe the MazdaSpeed) also lack this internal damper. One other observation: Since
the BSP design incorporates a skinny shaft, the shift boot can droop down it, which it can't do with the
OEM or C's design. I solved this problem easily, just by sliding a few rubber bushings (Pep Boys Ford
suspension bushings) down the BSP kit's shaft. Works absolutely perfectly by holding up the shift boot,
for only a few bucks.
I like the low cost of the BSP kit (although I suspect even it includes a huge mark-up) and the fact that it
drops the shift knob deep into the shift boot, for an excellent appearance and feel. But if you want top
quality and don't mind the price or high shift knob, then get the C's.
| Back to the Garage |
21 September, 2007 |
| [Home] - [FAQ] - [Search] - [Sponsors] - [Forums] |
| [Garage] - [Clubs] - [Contact Us] - [Disclosures] - [More...] |
Copyright
©1994-2024, Eunos Communications LLC
|